 CastleDB
CastleDB is a structured static database easing collaboration.

New version includes Map Editor !
Why
CastleDB is used to input structured static data.
Everything that is usually stored in XML or JSON files can be stored and modified with CastleDB instead.
For instance, when you are making a game, you can have all of your items and monsters including their names, description, logic effects, etc. stored in CastleDB.
How
CastleDB looks like any spreadsheet editor, except that each sheet has a data model.
The model allows the editor to validate data and eases user input.
For example, when a given column references another sheet row, you will be able to select it directly.
Storage
CastleDB stores both its data model and the data contained in the rows into an easily readable JSON file.
It can then easily be loaded and used by any program.
It makes the handling of item and monster data that you are using in you video game much easier.
Collaboration
CastleDB allows efficient collaboration on data editing.
It uses the JSON format with newlines to store its data, which in turn allows RCS such as GIT or SVN to diff/merge the data files.
Unlike online spreadsheet editors, changes are made locally. This allows local experiments before either commiting or reverting.
The Data Model

A database consists of several sheets. Each sheet is a collection of structured objects (similar to a TABLE in a traditional database).
Each sheet contains several named columns. The columns represent the stored data object fields.
Each column has a given type which represents the kind of data that is stored in this column.
CastleDB handles column renaming, deleting and conversion between column types.
Column Types
The following types are available for columns types:
- Unique Identifier
-
This is an unique identifier for the current row. It allows referencing this row from other sheets or columns. Unique identifiers must be valid code identifiers
[A-Za-z_][A-Za-z0_9_]*. - Text
- Any text can be input into this column. CastleDB currently does not allow multiline text.
- Boolean
-
A checkbox can be used to specify if the column is
trueorfalse. - Integer
- A integer number (which does not have fractional component).
- Float
- Any number.
- Color
- A numerical value that represents an RGB color.
- Enumeration
-
An exclusive choice between a number of a given custom values. For example:
Yes,No,Cancel,Error - Flags
-
Several optional choices between a list of given custom values. For example:
hasHat,hasShirt,hasShoes. - Reference
- A reference to another sheet row, using its unique idenfier.
- File
- A relative or absolute path to a target file or image.
- Image
- An image to be displayed and stored in the database.
- Tile
- A sub part of a tileset image.
- List
- A list of structured values learn more.
- Custom
- A custom type learn more.
- Dynamic
- Any JSON data that you can input.
- Data/Tile Layer
- Packed layer information for map edition learn more.
Column Storage and default value
The following table tells how each type is stored into the CDB/JSON file:
| Column Type | Storage | Default Value |
|---|---|---|
| Unique Identifier | the identifier String | "" |
| Text | the text String | "" |
| Boolean | true or false |
false |
| Integer | the integer value | 0 |
| Float | the number value | 0 |
| Color | the color value as integer | 0 (black) |
| Enumeration | the integer index of the selected value | 0 (first value) |
| Flags | a bit is set for each index of the selected values | 0 (no selected value) |
| Reference | the string of the target's unique identifier | "" (missing identifier) |
| File | the relative (if possible) or absolute path to the file | "" (missing file) |
| Image | the string of the MD5 of the image content bytes, stored in the separate .img JSON data | "" (missing image) |
| Tile | a structure in the form of {file:'my.png',size:16,x:5,y:5} with optional width and height fields. |
null (missing tile) |
| List | an Array of structured objects learn more | [] (empty array) |
| Custom | a mixed array representation learn more | null (missing type) |
| Dynamic | the parsed JSON data value | null |
| Data Layer | width x height bytes indexes encoded as Base64 learn more | "" (empty layer) |
| Tile Layer | either the same as DataLayer or an array of objects learn more | "" (empty layer) |
Optional Column
If you uncheck the Required checkbox when creating/modifying a column, the default data will be null. It will also remove the field from the stored object in case no data is present.
Using CastleDB Editor
Loading and Saving
Using the File menu, you can create a New file and Load and Save As your .cdb file.
Everytime you make a change the database file is automatically saved.
Keys
Here are the most frequently used keys for CastleDB:
- Arrows are used to navigate between the cells. You can start typing to replace the cell content or use
F2orEnterto edit it. - Use
Escto exit cell edition or close opened List - Use
Insertto insert a new row at the cursor position - Use
Ctrl+ZandCtrl+Yto Undo/Redo your changes - Use
TabandShift+Tabto navigate to next/prev cell on the same row - Use
F4to go the row referenced by the cell andF3to search for references of this row"
Managing sheets
In order to manage sheets, right click on the sheet title in the bottom bar of the editor. You will be able to:
- Add a new sheet
- Move the sheets to reorder them
- Rename and Delete the sheet
- Access sheet options such as Index and Groups
Managing columns
Right click on the column title in order to access to the following options:
- Edit the column allowing you to rename it, change its type and its required flag.
- Move the columns to reorder them
- Add a new column
- Delete the column or set it as Display Column or Icon
- Convert the column content if some convert functions are available for this type.
CastleDB offers automatic conversion between column types. This is useful when changing the column type or copy/pasting data between columns/sheets.
If no conversion is available, you will get an error when changing the column type.
Managing rows
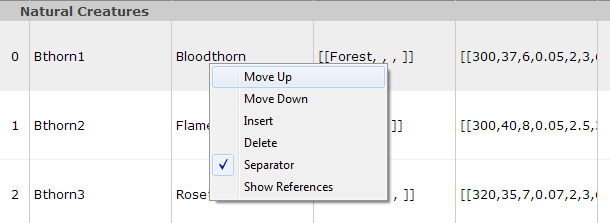
Right click on a row index to select the row and access the following options:
- Move Up and Down the row, which can also be triggered by using
Ctrl+UpandCtrl+Downarrows - Insert a new row at the cursor position, same as
Insertkey - Delete the selected row(s), same as
Deletekey - Insert or remove a Separator for this row
- look for the references pointing to this row (requires an unique identifier)
Selection
You can select one row by clicking on its index, then select several of them by clicking while holding shift and clicking on other row indices.
You can select a range of cells by first selecting a cell then holding shift while clicking on another cell.
You can copy/paste using Ctrl+C, Ctrl+V and Ctrl+X between columns and rows.
More Features
Display Column
If you right click on a column and check Display Column, this column will be used instead of the unique identifier when displaying a row reference.
This can be useful to display the real name of an item instead of its unique identifier.
The stored data and that data input is still made using the unique identifier, this only affects how things are displayed in the CastleDB editor.
Display Icon
If you right click on a column of type Tile and check Display Icon, this tile icon will be displayed in front of the name of each instance when displaying a row reference.
Index
When you open CastleDB, each row is referenced by a 0-based index.
Usually this index is not part of the exported data but you can add it by right-clicking on the sheet name, then check Index. It will add an index object field to your data.
For List column types, the index will be unique for the given column.
Separators
If you right click on a row index, you can check Separator which will create a small visible separator between this row and the previous one.
You can double-click on the separator to name it.
Add Group
If you right-click on the sheet name and check the Add Group, it will create a group field that will be an integer index for each row .
The index starts at 0, then each time a new separator with a defined title is reached, it will increment by one (unless the first row separator has a title).
This will allow you to categorize your sheet rows easily without having to create a specific column for it.
Advanced Types
List Column Type
When you set the type of a column as List a new hidden sheet will be created.
You can then add columns to this sub-sheet and modify it as you would any another sheet.
However, the difference is that the data of this sheet is split between your original sheet rows.
You can click on the list to toggle its content and insert rows into it.
A List is similar to the one-to-many database association.
Image
The images inserted into the database are stored into a separate .img file. Only the MD5 key of the image is stored into the .cdb database.
As a consequence, the same image can be used multiple times without increasing overall file size.
If you do a lot of images changes, you can use the Clean Images command in the application file menu. This will remove all images that are no longer used from the .img file.
Custom Types
Custom types are a structured types declared as enums, consisting of several constructors.
Custom types can be created and modified by using the Edit Types link at the bottom-right of the editor.
Here's an example of a custom type with four constructors:
enum MyCustomType {
	Fixed;
	Random( v : Float );
	Monster( ?m : monsters );
	Or( a : MyCustomType, b : MyCustomType );
}
In that case, a column of this custom type can be one of the following values:
Fixed
Random(0.5)
Monster(MyMonsterId)
Or(Random(0.5),Fixed)
A custom type constructor parameter can use the following types:
Intan integer valueBoola boolean valueFloatany number valueStringa string valueCustomTypeany custom type, including itselfSheetNameany sheet name created in the database
If a constructor parameter is prefixed with a ?, then it means it's optional and can be omited.
Custom types are stored as a mixed array content. The first element of the Array is the index in the constructors list followed by the eventual parameters for this constructor.
| Value example | Stored value |
|---|---|
Fixed |
[0] |
Random(0.5) |
[1,0.5] |
Monster(MyMonsterId) |
[2,"MyMonsterId"] |
Or(Random(0.5),Fixed) |
[3,[1,0.5],[0]] |
Custom type input is strictly validated by CastleDB editor.
Map Editor
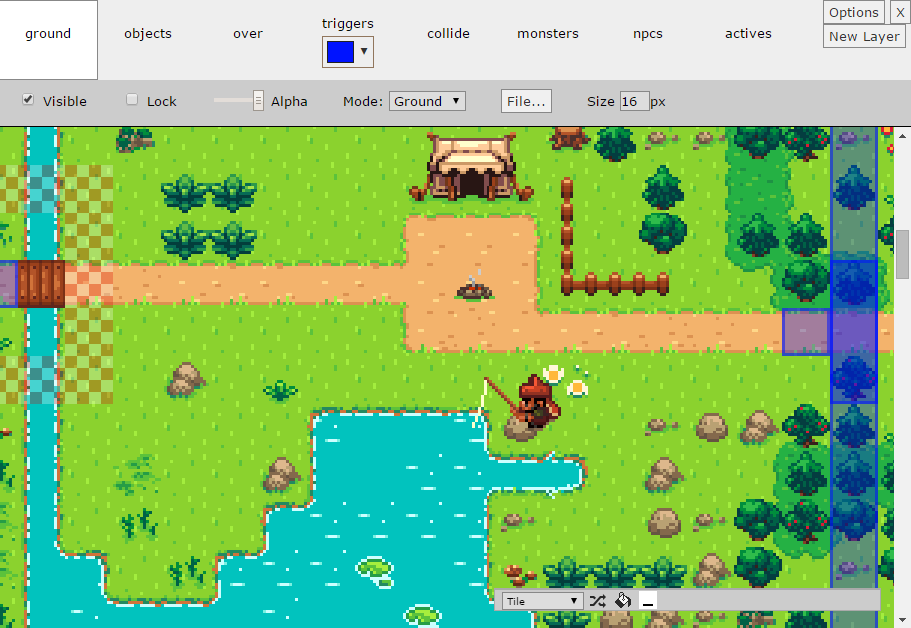
Starting with CastleDB 1.1, you can now have a 2D Map Editor that uses CastleDB data for all its input.
Download the sample project, we will use it as a reference in the following description.
Important: The difference between using CastleDB to create your levels and an external editor is that you can assign images/tiles to each of your data, then place them using the CDB map editor. This allows you to have a unified framework for creating the whole content of your game.
Create Level
When creating a new sheet, check the Create Level option in order to create a level sheet. This will automatically create the necessary columns that let you to create and edit tile layers.
Layers

A layer is a set of information that is stored in one of the fields of the Level sheet. There are several kind of layers:
- Tile Layer
- These layers can be created as soon as you create a new level. Each layer has a name and can be assigned to a tileset. A tile layer can be displayed using three different modes : Tiles, Ground, Objects learn more
- List Layer
-
If you add a List column to your level sheet that has
xandynumerical properties a list layer which you can visually edit will be created. You can add extra properties/columns to the List that you will be able to input directly into the editor. In particular, if you add aReferenceto another sheet which has aTileorImage, you will be able to place these directly into your map. - Index Layers
-
If you want to to paint things and have them stored in a compact array instead as of a list of positions, add a column of type
Layerto your level sheet. As a restriction, you will not be able to add custom per-cell properties. If you are not on the first layer, the first element of your layer (which has0index) will not be displayed and will act as a transparent element. - Zone Layer
-
A zone layer is similar to the List Layer except that it has additional
widthandheightnumerical properties. It will be displayed as a given zone in the map editor.
In the sample level, our layers consists of :
layersseveral tile layers for the ground and unbreakable elementstriggerszone layers for placing in-game (blue) triggerscollidean index layer of collisions (which are also defined in CDB)npcsa list layer of characters that enable us to place them into a map with extra properties
Layer Display
A layer extracts the information from the reference it targets:
- If the reference has a field of type
Image, it will use the image for display - If the reference has a field of type
Color, it will use the color for display - If there is no information available, you will be able to customize the layer global color
Grid and Precise coords
Index layers are always grid-aligned. Other layers can have more precise positions if you use Float instead of Int for their positions. In that case it's still be possible to activate the Lock Grid option.
By default, the grid size is set to 16 pixels. This can be modified in the level options.
Layer Compression
By default, layer data is stored uncompressed. If you are creating a lot of tile/index levels this can result in very big files.
You can enable/disable the compression of these layer data by doing File / Enable Compression.
This will compress using the LZ4 algorithm which is easy and fast to decompress.
Common layers options
You can modify the following properties when clicking on any layer:

Visibletoggle visibility. Please note that this is only used for editing, it is not stored as part of the CDB data.Lockallows to lock the layer, making it impossible to modify it until it's unlocked.Alphachanges the alpha value of the layer. Unlike Visible, it is stored in CDB data.
Additionaly, you can right-click on a layer to get the following options:
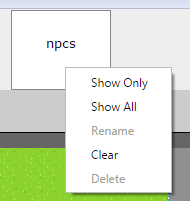
Show Onlywill hide all layers except this one.Show Allrestores all layers to visible.Renamechanges the layer name (tile layer only, other layers names can be changed by renaming the corresponding column)Clearclears the layer data.Deleteremoves the layer clear (tile layer only, other layers can be removed by deleting the corresponding column)
Tile Layers
A tile layer consists of an array of tiles from a single tileset.
You can change the following properties when clicking on a layer:

Modea tile layer can work in three different modes. The default mode is Tiles, other modes are detailed belowFileallows you to change the tileset for this layerSizeby default CDB uses 16x16 tiles. You can change it on a per layer basis. Please note that you should also change your level tile size by using theOptionsmenu.
Objects Mode
Objects mode is a different way of storing your tiles.
While in Tile Mode, the layer data consists of an array of width x height tiles, the object mode is a list of X,Y,Tile.
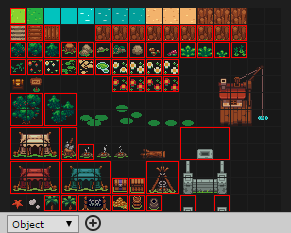
In order to use Object Mode, you must first group one or several tiles into an Object by using the tile palette. Select the Object mode and you will be able to group several tiles by using the (+) button or pressing O
You can now put your objects into your Tile Layer. Objects are sorted accordingly to their lower Y, so it means that unlike in Tile Mode you can have several objects that mask each other.
Object positions are in pixels, not in the grid. You can still align the objects to the grid by using the G key.
You can also flip and rotate the tiles that are put into the Object Layer by using F and D keys.
The encoding of Object Layer is a list of base64 encoded 16-bits values as follows:
0xFFFF: marks this layer as Object Layer, followed by the below information, for each object :Xthe X position of the object in the level in pixelsYthe Y position of the object in the level in pixelsIDthe object id, which is its position in the tileset
Each of these three values can have their higher bit set: the object rotation is encoded into the higher bit of X and Y. The flip flag is encoded into the higher bit of the ID value.
Ground Mode
The ground mode is similar to the tiles mode except that you can configure Grounds and Borders so they get automatically generated for you.
Try changing the ground layer in the sample between Ground and Tile to see the difference.
At the moment, documentation on how to setup grounds and borders is not available yet.
Per-tile Properties
Each tile of each tileset can have some properties which are shared between levels.
You can specify these properties by modifying the level tileProps columns.
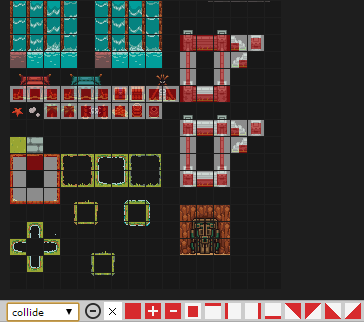
In the sample, we have created a collide column which references our collide sheet and allows us to
specify a per-tile collision.
In order to edit the per-tile properties, select the property name in the drop down menu of the tile palette. You will be able to set the property value for each tile. Please note that this information is shared between levels, so modifying a tile property for a level will also modify it for other levels.
List layers
List layers allows you to place some instances referencing another sheet in your level.
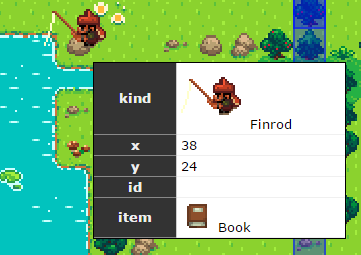
In our example level, we have an npcs column which is a List containing kind x y and item values.
kind references the npc sheet, so the npc image will be used to display the instance in the level editor.
Once an instance is put into the level, you can use the E key with your mouse over it to edit its properties.
Unlike tile layers, list layers are normal CDB data which can also be edited directly through the spreadsheet editor.
Zone layers
Zone layers are similar to list layers except that they also have width and height properties, allowing them to cover a zone of your level.
Their properties can also be edited with the E key.
Shortcuts
Right-clickpick tile under cursorTabnext layerShift+Tabprevious layerVtoggle visibility for current layerLtoggle lock for current layerGtoggle grid lock (tile layers in Objects mode and List/Zone layers with Float positions only)Itoggle palette visibilityPpaint with current tileRtoggle random mode (select a random element as part of current palette selection)+/-(numpad) zoom/dezoom level/(numpad) return to default zoomEedit list/zone layer instance propertiesEscclear selectionSpacehold to scrollFflip current tile (tile objects only)Drotate current tile (tile objects only)Ocreate object group in tile palette
Haxe Integration

CastleDB was created using the Haxe technology, it also allows some Haxe-specific integration.
The powerful Haxe Macros will allow direct generation of all the type declarations from the CastleDB Data Model.
This is simply done by creating a source file such as:
// Data.hx
private typedef Init = haxe.macro.MacroType<[cdb.Module.build("myDataFile.cdb")]>;
When compiling with -lib castle, this will create all the types stored in the CDB model.
You can still initialize your CDB data at runtime, then access it using the accessors:
var content : String = .... // load CDB file content
Data.load(content);
Data.monsters.all; // all the objects of the "monsters" sheet
var dragon : Data.Monsters = Data.monsters.get(Dragon); // using the unique ID generated enum
trace(d.loot.name); // automatically fetch the Refenced objects
All the accesses are strictly typed by Haxe.
Generated types
The main type of the module is generated with the load static field and for each declared sheet a static field corresponding to the sheet name will be created.
If the sheet does not have an unique identifier, only the all field is available.
If the sheet has an unique identifier, you can access the all field, but also use get (by id) and resolve (by string).
For each sheet named mySheet we will generate the following types:
MySheetDefis the original object as parsed by JSON.MySheetis an abstract type that allows only reading the fields and perform some conversions (see below)MySheetKindis an enum containing all the unique identifiers found inmySheet
The MySheetKind type is an abstract value so the actual runtime value is still the identifier string. However, it allows for strictly typing the identifiers. You can still use .toString() to access the original string.
Column type mapping
The different column types are mapped to the following types:
- Unique Identifier
-
SheetNameKind: an abstract enum is created for each sheet - Text
-
String - Boolean
-
Bool - Integer
-
Int - Float
-
Float - Color
-
Int - Enumeration
-
SheetName_ColumName: an abstract enum is created. If they have the same values in the same order, they are all aliases to the same enum. - Flags
-
cdb.Types.Flags<SheetName_ColumnName>: an abstract enum is created as for Enumeration. The bits are wrapped using theFlagsabstract which allows typedhasanditeratormethods. - Reference
-
TargetSheetName: referenced object is fetched when accessed. You can access only the identifier by usingcolumnNameIdfield. - File
-
String - Image
-
String: the MD5 key only, no image loading is supported at the moment. - Tile
-
cdb.Types.TilePos: contains the tileset file and size, the x/y position and optional width/height (by default it is 1) - List
-
cdb.Types.ArrayRead<SheetName_ColumnName>: a read-only array of the structured objects, allows indexed access, length and iteration. - Custom
-
SheetName_ColumnName: values are converted on-the-fly to the enum created as it has been declared. - Dynamic
-
Dynamic: data as-it. - Data Layer
-
cbd.Types.Layer<SheetName>: you can decode the layer by passing theData.sheetName.allarray to thedecode()function. - Tile Layer
-
cbd.Types.TileLayer: you can decode the layer by using thet.data.decode()function. It will automatically decompress data and will return an Array of 16-bits values. If the tile layer is in tile/ground mode, this gives you width x height values. If it is in object mode, see the object layer encoding section.
Example
You can see a small example of Haxe integration on GitHub here.
If you want to see what code is being actually generated, you can compile with -D dump=pretty and look at the dump directory after successful compilation.
Warning : castle library requires either Haxe 3.2+ or a recent Haxe build to work. You can download it from this page
About
CastleDB was created by @ncannasse using Haxe and Node Webkit. It's hosted on GitHub and used professionally by Shiro Games.
CastleDB was notably used to create the whole content for Evoland 2
CastleDB is an open source software usable in commercial projects without any restriction.
 Windows x64
 OSX x64
 NWJS Package
  GitHub